ShopDreamUp AI ArtDreamUp
Deviation Actions

The blueprint of... is an article series in which we’re taking a closer look at an Artisan Crafts deviation and how it's made.
Today we are dissecting Wibble pot 003 by alex190381

My names Alex, I'm 28 and from the North of England, I grew up here and although its beautiful, my fiancee and I are moving to London to complete the rest of my Architecture training. Prior to my architecture training I undertook a Bachelors Degree in Homewares/furniture (3 years) which is where these ceramic products were developed. After the degree I opened a small pottery, which lasted for a couple of years and I sold my work through galleries and small craft shops around the UK. I haven't done any pottery for a long time now, as I worked for a furniture company and now work for an Architecture practice, but someday I'd like to get back on a wheel and do work for my own enjoyment. Even so, my partner says I'm a better architect than I am a potter!
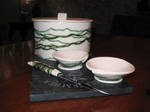
This is a form that I developed on my bachelor course as part of a series of porcelain vessels and lights. They were based on the the theory that porcelain retains a "memory" of its previous form, like some plastics. Some of the forms were made by hand to reflect the forms that were in theory possible. This "wibble pot" however was a direct result of an accident in the kiln when it was fired to a temperature higher than usual. The forms were developed to make a viable product from this interesting process.
It has been likened to a stack of popadoms, tape worms, whirlwinds, the inside of an ant hill, a parking ramp and many other things but is actually two sets of graduating hoops made from very thin porcelain, over-fired in a kiln and then joined together with a low-fired glaze and then fired again.
Its actually a very simple process. I rolled out 2 sheets of porcelain until they were as thin as possible (1-2mm). I then scribed concentric circles on to each with a converted compass, one circle had a slightly smaller diameter than the other to provide an overlap in the finished assembly. Then it was a case of carefully seperating the layers out without deforming them and letting them dry. After the rings dried, they were laid out on the kiln bed and then fired beyond the recommended temperature for porcelain. The higher temperature meant that the rings lifted, twisted and warped in a variety of ways. The resulting deformed shapes were then sprayed with a low firing transparent glaze and stacked, one concentric circle interleaved with the other until a teetering whirlwind form was achieved. The whole thing was carefully placed into the kiln and fired. and thats about it, I tried many variations on the technique, but this remained the best.
Most of them were completed at the pottery I owned or the university workshops.
Rolling pin, converted compass (scalpel blade instead of pencil), kiln, oven, glaze bin.
The original idea for the range came from my obsession with sinuous curves, landscape contours, parallel and repeating lines and the technical side of craft. So there aren't really any links apart from a google search for maps and any etchings or technical drawings you've ever seen.
Probably a week or so, although I made them in batches as the loss at all points of the manufacturing process was so high, so its difficult to tell.
Nothing unexpected apart form the birth of the process itself. The only problems tended to be the fragility and as mentioned before the amount of breakages, misfires and getting the thickness of the glaze right to adhere to the pre fired rings. I had to heat the rings up in a small oven to get the glaze to stick in the end.
I love them, although I'm always frustrated by its lack of true function.
Mostly at university, although there was a lot of experimentation and reading that needed to be done when dealing with your own equipment. I suspect I'll have to start learning again when I finally get my hands back in the mud.
These were difficult to photograph so I just concentrated on using a black matt background and some strong lighting to get the best out of the convoluted shapes
Experiment, and don't be scared of mistakes. Also, pottery isn't just about the raw clay, its about all the little processes that go to make the finished piece. You could make something beautiful or ugly just by changing the smallest variable. Thats the most exciting thing for me.
I used to but not anymore, I only have a few left scattered around friends and family, so they're staying firmly where they are!


Thank you alex190381 for participating and taking the time to answer my questions!
//Myana
I'd love to receive suggestions for the next "victim" to interview! Note me with a link to the deviation you'd like to know more about and I'll contact the deviant.
Previous articles:
• The blueprint of... My Little Alien by Spippo
• The blueprint of... Devil Claw Gargoyle by ART-fromthe-HEART
• The blueprint of... 30 full view by vankuilenburg
• The blueprint of... Flying Jewel Ring by LaughingScarab
• The blueprint of... Golden Chinese Dragon by Richi89
• The blueprint of... Leather corset by tupali
• The blueprint of... Galding's Runesmith Armor by farmerownia
• The blueprint of... corset with gussets by crissycatt
• The blueprint of... Red Cross 9.26.08 by UniquelyYours
• The blueprint of... Rosemary 1 by dollmaker88
• The blueprint of... Tsuru by merimask
• The blueprint of... Duct Tape Queen Of Hearts by DuckTapeBandit
• The blueprint of... Snekkja by Thorleifr
• The blueprint of... Dragon Chain Revisited by StephaniePride
• The blueprint of... More Vessels by ellyloo
• The blueprint of... Cosplay: Belle by Adella
• The blueprint of... Calla Lilly Chocolate Box by Sliceofcake
• The blueprint of... Louis Vuitton Hand bag cake by Dragonsanddaffodils
• The blueprint of... Red wave glass tile pendant by inchworm
• The blueprint of... Pharoah's Horses by indeestudios
• The blueprint of... Copper Mech Dragon by NycterisA
• The blueprint of... Armor by flintlockprivateer
• The blueprint of... Shrimp by YAGGOB
• The blueprint of... Tears of a Clown B by cdlitestudio
• The blueprint of... Gothic Armour - Full View. by Ageofarmour
• The blueprint of... Lulu - FFX 10 by yayacosplay
Today we are dissecting Wibble pot 003 by alex190381
First off, please introduce yourself?
My names Alex, I'm 28 and from the North of England, I grew up here and although its beautiful, my fiancee and I are moving to London to complete the rest of my Architecture training. Prior to my architecture training I undertook a Bachelors Degree in Homewares/furniture (3 years) which is where these ceramic products were developed. After the degree I opened a small pottery, which lasted for a couple of years and I sold my work through galleries and small craft shops around the UK. I haven't done any pottery for a long time now, as I worked for a furniture company and now work for an Architecture practice, but someday I'd like to get back on a wheel and do work for my own enjoyment. Even so, my partner says I'm a better architect than I am a potter!
Please explain what we are viewing.
This is a form that I developed on my bachelor course as part of a series of porcelain vessels and lights. They were based on the the theory that porcelain retains a "memory" of its previous form, like some plastics. Some of the forms were made by hand to reflect the forms that were in theory possible. This "wibble pot" however was a direct result of an accident in the kiln when it was fired to a temperature higher than usual. The forms were developed to make a viable product from this interesting process.
It has been likened to a stack of popadoms, tape worms, whirlwinds, the inside of an ant hill, a parking ramp and many other things but is actually two sets of graduating hoops made from very thin porcelain, over-fired in a kiln and then joined together with a low-fired glaze and then fired again.
Can you describe for a layman how it’s made?
Its actually a very simple process. I rolled out 2 sheets of porcelain until they were as thin as possible (1-2mm). I then scribed concentric circles on to each with a converted compass, one circle had a slightly smaller diameter than the other to provide an overlap in the finished assembly. Then it was a case of carefully seperating the layers out without deforming them and letting them dry. After the rings dried, they were laid out on the kiln bed and then fired beyond the recommended temperature for porcelain. The higher temperature meant that the rings lifted, twisted and warped in a variety of ways. The resulting deformed shapes were then sprayed with a low firing transparent glaze and stacked, one concentric circle interleaved with the other until a teetering whirlwind form was achieved. The whole thing was carefully placed into the kiln and fired. and thats about it, I tried many variations on the technique, but this remained the best.
What tools did you use?
Most of them were completed at the pottery I owned or the university workshops.
Rolling pin, converted compass (scalpel blade instead of pencil), kiln, oven, glaze bin.
What was your inspiration in creating this?
The original idea for the range came from my obsession with sinuous curves, landscape contours, parallel and repeating lines and the technical side of craft. So there aren't really any links apart from a google search for maps and any etchings or technical drawings you've ever seen.
How much time did it take you to make this?
Probably a week or so, although I made them in batches as the loss at all points of the manufacturing process was so high, so its difficult to tell.
Did you run into anything unexpected while creating this?
Nothing unexpected apart form the birth of the process itself. The only problems tended to be the fragility and as mentioned before the amount of breakages, misfires and getting the thickness of the glaze right to adhere to the pre fired rings. I had to heat the rings up in a small oven to get the glaze to stick in the end.
Are you happy with the result?
I love them, although I'm always frustrated by its lack of true function.
Where have you learnt your skills in this area?
Mostly at university, although there was a lot of experimentation and reading that needed to be done when dealing with your own equipment. I suspect I'll have to start learning again when I finally get my hands back in the mud.
Do you take your own photos? Any tips you want to share for presenting your work?
These were difficult to photograph so I just concentrated on using a black matt background and some strong lighting to get the best out of the convoluted shapes
What is the best tip you can give to others wanting to test this craft/material/technique?
Experiment, and don't be scared of mistakes. Also, pottery isn't just about the raw clay, its about all the little processes that go to make the finished piece. You could make something beautiful or ugly just by changing the smallest variable. Thats the most exciting thing for me.
Are you selling your work?
I used to but not anymore, I only have a few left scattered around friends and family, so they're staying firmly where they are!
Thank you alex190381 for participating and taking the time to answer my questions!
//Myana
I'd love to receive suggestions for the next "victim" to interview! Note me with a link to the deviation you'd like to know more about and I'll contact the deviant.
Previous articles:
• The blueprint of... My Little Alien by Spippo
• The blueprint of... Devil Claw Gargoyle by ART-fromthe-HEART
• The blueprint of... 30 full view by vankuilenburg
• The blueprint of... Flying Jewel Ring by LaughingScarab
• The blueprint of... Golden Chinese Dragon by Richi89
• The blueprint of... Leather corset by tupali
• The blueprint of... Galding's Runesmith Armor by farmerownia
• The blueprint of... corset with gussets by crissycatt
• The blueprint of... Red Cross 9.26.08 by UniquelyYours
• The blueprint of... Rosemary 1 by dollmaker88
• The blueprint of... Tsuru by merimask
• The blueprint of... Duct Tape Queen Of Hearts by DuckTapeBandit
• The blueprint of... Snekkja by Thorleifr
• The blueprint of... Dragon Chain Revisited by StephaniePride
• The blueprint of... More Vessels by ellyloo
• The blueprint of... Cosplay: Belle by Adella
• The blueprint of... Calla Lilly Chocolate Box by Sliceofcake
• The blueprint of... Louis Vuitton Hand bag cake by Dragonsanddaffodils
• The blueprint of... Red wave glass tile pendant by inchworm
• The blueprint of... Pharoah's Horses by indeestudios
• The blueprint of... Copper Mech Dragon by NycterisA
• The blueprint of... Armor by flintlockprivateer
• The blueprint of... Shrimp by YAGGOB
• The blueprint of... Tears of a Clown B by cdlitestudio
• The blueprint of... Gothic Armour - Full View. by Ageofarmour
• The blueprint of... Lulu - FFX 10 by yayacosplay
Exciting news: New job!!
Theater carpenter
Last week I started a new job as a carpenter at the city's theater, I'll be doing backdrops/coulisses, props, furnitures and much more. I'm quite excitied to be working much more creative and to be back in a workshop. :yay: (The job I've had for the last year have been reparing stuff at people's houses.)
Hopefully they'll let me photograph what I do and if so, you'll see it :)
New camera
And to celebrate my new job, I went a bought myself a new camera. I couldn't spend too much on it, but I went with Canon EOS 550 D with a 18-135 objective. I'm really satisfied with it. Now I'm waiting for spring so I go out and shoot :)
Not dead
Wow, first submissions in over a year!!
Everyone, I'm aliiiiive! :P
Although I'm probably not gonna be any more active, I just wanted you to know I'm doing great. Svante is soon 2.5 years and offcourse he's a bundle of joy!
How are you all?
:thumb197524914: :thumb197526347:
ArtisanCraft Group
Groups
As you know by now, the new shiney Group-system is in BETA now and lots and lots of clubs are converted to it.
#ArtisanCraft (https://www.deviantart.com/artisancraft) ArtisanCraft (https://www.deviantart.com/artisancraft) has successfully converted to a group and I was delighted to be asked by MyntKat (https://www.deviantart.com/myntkat), who is handling the wheel on that ship now, if I wanted to be part of the club as co-admin again. Of ocurse! I will try to be a little more active, both on the club and on my personal account.
I've only played with the group a little, but man - I love it! The things I've seen is making the life of a group-admin soooo much easier. Way to go, tech team of dA! We salute you!! :heart:
Recent AC fav's
:t
The blueprint of... Red Tailed Hawk 2
The blueprint of... is an article series in which we’re taking a closer look at an Artisan Crafts deviation and how it's made.
Today we are dissecting Red Tailed Hawk 2 by Bagheera3 (https://www.deviantart.com/bagheera3)
:thumb125509468: :thumb125509249: :thumb125509468:
First off, please introduce yourself?
My name is Bill Douglas and I live in Ontario, Canada. I am 68 years old and I started carving as a hobby, 12 years ago.
Please explain what we are viewing.
This is a red-tailed hawk which I carved from tupelo wood. It is approximately 1/4 life-size. I made it in 2006. It is painted with acrylic paint.
Can you describe for a layman how it’s made?
I start
© 2009 - 2024 Myana
Comments1
Join the community to add your comment. Already a deviant? Log In
excellent subject and most interesting for a "blueprint of..."
