ShopDreamUp AI ArtDreamUp
Deviation Actions

The blueprint of... is an article serie where we’re taking a closer look on an Artisan Crafts deviation and how it's made.
Today we are dissecting Flying Jewel Ring by LaughingScarab

I am Mateo, metalsmith and increasingly general artisan and sole proprietor of Laughing Scarab Studio. I live in Towson, Maryland, USA; where I pretty much lurk in the basement and make things. These days I am mostly working on contracts for a costume studio, but I still find a little free time to make my jewelry and similar such things.
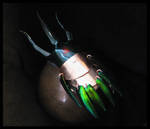
This piece, the Flying Jewel Ring, is a silver ring incorporating beetle shells where you would normally see gemstones (a theme which I frequently explore). In this case, I devised a setting for an entire Green June Bug shell and mounted it atop the ring. Inlaid Jewel Beetle shells add flash to the band and their iridescence plays beautifully off of the beetle’s coppery, mirrored underside. Thin silver wires form a pair of wings, illustrating rapid, buzzing flight.
I began with fine (99.999% pure) silver sheet and wire stock. I am weird about my metal sometimes, I like to use the purest possible, although it could be done just as easily with sterling. The sheet stock was cut into a strip and folded up at the edges (lengthwise) to make a sort of half-rectangle shape. This form was bent around into the ring shape, and soldered closed.
I then bent & cut the wire into the wing shapes, and laid them flat on a charcoal block, where I soldered them together at the bases, and soldered those to either side of a loop that had been fitted to the outer perimeter of the beetle. Thicker wire was formed into a Y-shaped prong, which was soldered onto the outside of one of the ‘walls’ of the ring, and a long prong which was soldered onto the outside of the opposite ‘wall’.
Before setting the beetle, I cut strips of Jewel beetle shell and inlaid them around the bend by folding the ‘walls’ down over the edges of each piece.
Because the thick prongs had to be folded down with the walls that they were attached to, I did not solder the wing structure on before setting the beetle shells around the band- this is generally a tremendous no-no in the world of jewelry, since the heat used in soldering tends to damage anything non-metal that is attached to the piece, but I had done some experiments earlier and found that beetle shell, amazing material that it is, is quite resistant to indirect heat. I decided to use the best of my torch skills and solder the wing structure on afterwards, using a small flame and a light touch. It worked out brilliantly, with no damage to the shells!
The ring was then structurally finished, so I rounded off the ends of the prongs and gave the whole thing a quick polish. The final step was the setting of the beetle.
To prepare the beetle’s shell, I washed it in alcohol, dried it out with silica gel, and removed its legs and antennae with a pair of tweezers, as these parts would surely catch on things and fall off. When that was done, I slid the beetle into the setting headfirst, bent the front prongs down over it, then slid the abdomen into place and locked it down with the back prong. A careful final polishing finished it up.
This piece was made about 75% in my home studio and 25% at the much more equipped studio at school. The tools used included two types of hammers, a bending brake, a rolling mill, a ring mandrel, a flex shaft machine with assorted bits, a jeweler’s saw, various pliers, a benchmate, a propane/oxygen torch, a metal shear, and regular scissors.
I have always been into bugs, and in recent years, beetles have especially caught my fancy. This probably has to do with their ability to be both amazing animals and amazing craft materials (when their time has run out). The beauty of the June Bug was a major inspiration here, as was the desire to experiment.
This piece took about 5 hours of actual work time, though there was also a lot of planning and experimentation that led up to it. The first design had seven prongs, for instance- totally pointless.
There was much experimenting beforehand, so I wasn’t surprised by anything. The only snag I discovered was that I made the back prong a bit too short, so it slightly crushed the beetle’s abdomen as I set it. The damage was miniscule and not noticeable, though.
This piece turned out pretty much exactly as I wanted it. I am still working on the ideal setting for an insect specimen, but this was a good first piece.
I learned the craft of metalsmithing at the Savannah College of Art & Design in Savannah, Georgia, USA. The beetle-shell work, however, is something that no one teaches- I had to learn it all by experimentation.
I take all my own photos. I would say that craft photography in general is much better when there is some sort of environment for the piece- be it a textured background or a whole setting in which to display it. I am not of the “black to white gradation and ultra-diffused white light” school of photography. A favorite tip: after taking the photo, go into photoshop and add a black border. Black borders make everything look more "professional"
Wanting to test metalwork? Be prepared to spend lots of money unless you can borrow someone’s tools or use a school studio. Start out simple; cut out neat shapes with a jeweler’s saw and solder them together into pendants and the like.
Wanting to test beetle shells? Start with Sternocera aequistignata (Thai jewel beetle) elytra (wing covers). You can buy them by the hundred, or by the kilo if you are so inclined; and you can rest assured that the beetles themselves were used for food, not just killed en masse for their shells. There is a seller on eBay who routinely puts up large quantities of these shells for relatively low prices. They are large, beautiful and durable, perfect for a beginner, and I still use them more often than any other shell.
Yes indeed! I keep an Etsy shop at laughingscarab.etsy.com and I also sell work straight from my dA journal.
Thank you LaughingScarab for participating and taking the time to answer my question!


//Myana
I'd love to recive suggestions for next "victim" to interview! Note me with a link to the deviation you'd like to know more about and I'll contact the deviant.
Also, let me know if there are any questions you are missing in this type of interview!
Previous articles:
• The blueprint of... Spippo's 'My Little Alien'
• The blueprint of... Devil Claw Gargoyle
• The blueprint of... 30 full view
Today we are dissecting Flying Jewel Ring by LaughingScarab
First off, please introduce yourself?
I am Mateo, metalsmith and increasingly general artisan and sole proprietor of Laughing Scarab Studio. I live in Towson, Maryland, USA; where I pretty much lurk in the basement and make things. These days I am mostly working on contracts for a costume studio, but I still find a little free time to make my jewelry and similar such things.
Please explain what we are viewing.
This piece, the Flying Jewel Ring, is a silver ring incorporating beetle shells where you would normally see gemstones (a theme which I frequently explore). In this case, I devised a setting for an entire Green June Bug shell and mounted it atop the ring. Inlaid Jewel Beetle shells add flash to the band and their iridescence plays beautifully off of the beetle’s coppery, mirrored underside. Thin silver wires form a pair of wings, illustrating rapid, buzzing flight.
Can you describe for a layman how it’s made?
I began with fine (99.999% pure) silver sheet and wire stock. I am weird about my metal sometimes, I like to use the purest possible, although it could be done just as easily with sterling. The sheet stock was cut into a strip and folded up at the edges (lengthwise) to make a sort of half-rectangle shape. This form was bent around into the ring shape, and soldered closed.
I then bent & cut the wire into the wing shapes, and laid them flat on a charcoal block, where I soldered them together at the bases, and soldered those to either side of a loop that had been fitted to the outer perimeter of the beetle. Thicker wire was formed into a Y-shaped prong, which was soldered onto the outside of one of the ‘walls’ of the ring, and a long prong which was soldered onto the outside of the opposite ‘wall’.
Before setting the beetle, I cut strips of Jewel beetle shell and inlaid them around the bend by folding the ‘walls’ down over the edges of each piece.
Because the thick prongs had to be folded down with the walls that they were attached to, I did not solder the wing structure on before setting the beetle shells around the band- this is generally a tremendous no-no in the world of jewelry, since the heat used in soldering tends to damage anything non-metal that is attached to the piece, but I had done some experiments earlier and found that beetle shell, amazing material that it is, is quite resistant to indirect heat. I decided to use the best of my torch skills and solder the wing structure on afterwards, using a small flame and a light touch. It worked out brilliantly, with no damage to the shells!
The ring was then structurally finished, so I rounded off the ends of the prongs and gave the whole thing a quick polish. The final step was the setting of the beetle.
To prepare the beetle’s shell, I washed it in alcohol, dried it out with silica gel, and removed its legs and antennae with a pair of tweezers, as these parts would surely catch on things and fall off. When that was done, I slid the beetle into the setting headfirst, bent the front prongs down over it, then slid the abdomen into place and locked it down with the back prong. A careful final polishing finished it up.
What tools did you use?
This piece was made about 75% in my home studio and 25% at the much more equipped studio at school. The tools used included two types of hammers, a bending brake, a rolling mill, a ring mandrel, a flex shaft machine with assorted bits, a jeweler’s saw, various pliers, a benchmate, a propane/oxygen torch, a metal shear, and regular scissors.
What was your inspiration in creating this?
I have always been into bugs, and in recent years, beetles have especially caught my fancy. This probably has to do with their ability to be both amazing animals and amazing craft materials (when their time has run out). The beauty of the June Bug was a major inspiration here, as was the desire to experiment.
How long time did it take you to make this?
This piece took about 5 hours of actual work time, though there was also a lot of planning and experimentation that led up to it. The first design had seven prongs, for instance- totally pointless.
Did you run into anything unexpected while creating?
There was much experimenting beforehand, so I wasn’t surprised by anything. The only snag I discovered was that I made the back prong a bit too short, so it slightly crushed the beetle’s abdomen as I set it. The damage was miniscule and not noticeable, though.
Are you happy with the result?
This piece turned out pretty much exactly as I wanted it. I am still working on the ideal setting for an insect specimen, but this was a good first piece.
Where have you learnt your skills in this area?
I learned the craft of metalsmithing at the Savannah College of Art & Design in Savannah, Georgia, USA. The beetle-shell work, however, is something that no one teaches- I had to learn it all by experimentation.
Do you take your own photos? Any tips you want to share for presenting your work?
I take all my own photos. I would say that craft photography in general is much better when there is some sort of environment for the piece- be it a textured background or a whole setting in which to display it. I am not of the “black to white gradation and ultra-diffused white light” school of photography. A favorite tip: after taking the photo, go into photoshop and add a black border. Black borders make everything look more "professional"
What is the best tip you can give to others wanting to test this craft/material/technique?
Wanting to test metalwork? Be prepared to spend lots of money unless you can borrow someone’s tools or use a school studio. Start out simple; cut out neat shapes with a jeweler’s saw and solder them together into pendants and the like.
Wanting to test beetle shells? Start with Sternocera aequistignata (Thai jewel beetle) elytra (wing covers). You can buy them by the hundred, or by the kilo if you are so inclined; and you can rest assured that the beetles themselves were used for food, not just killed en masse for their shells. There is a seller on eBay who routinely puts up large quantities of these shells for relatively low prices. They are large, beautiful and durable, perfect for a beginner, and I still use them more often than any other shell.
Are you selling your work?
Yes indeed! I keep an Etsy shop at laughingscarab.etsy.com and I also sell work straight from my dA journal.
Thank you LaughingScarab for participating and taking the time to answer my question!
//Myana
I'd love to recive suggestions for next "victim" to interview! Note me with a link to the deviation you'd like to know more about and I'll contact the deviant.
Also, let me know if there are any questions you are missing in this type of interview!
Previous articles:
• The blueprint of... Spippo's 'My Little Alien'
• The blueprint of... Devil Claw Gargoyle
• The blueprint of... 30 full view
Exciting news: New job!!
Theater carpenter
Last week I started a new job as a carpenter at the city's theater, I'll be doing backdrops/coulisses, props, furnitures and much more. I'm quite excitied to be working much more creative and to be back in a workshop. :yay: (The job I've had for the last year have been reparing stuff at people's houses.)
Hopefully they'll let me photograph what I do and if so, you'll see it :)
New camera
And to celebrate my new job, I went a bought myself a new camera. I couldn't spend too much on it, but I went with Canon EOS 550 D with a 18-135 objective. I'm really satisfied with it. Now I'm waiting for spring so I go out and shoot :)
Not dead
Wow, first submissions in over a year!!
Everyone, I'm aliiiiive! :P
Although I'm probably not gonna be any more active, I just wanted you to know I'm doing great. Svante is soon 2.5 years and offcourse he's a bundle of joy!
How are you all?
:thumb197524914: :thumb197526347:
ArtisanCraft Group
Groups
As you know by now, the new shiney Group-system is in BETA now and lots and lots of clubs are converted to it.
#ArtisanCraft (https://www.deviantart.com/artisancraft) ArtisanCraft (https://www.deviantart.com/artisancraft) has successfully converted to a group and I was delighted to be asked by MyntKat (https://www.deviantart.com/myntkat), who is handling the wheel on that ship now, if I wanted to be part of the club as co-admin again. Of ocurse! I will try to be a little more active, both on the club and on my personal account.
I've only played with the group a little, but man - I love it! The things I've seen is making the life of a group-admin soooo much easier. Way to go, tech team of dA! We salute you!! :heart:
Recent AC fav's
:t
The blueprint of... Red Tailed Hawk 2
The blueprint of... is an article series in which we’re taking a closer look at an Artisan Crafts deviation and how it's made.
Today we are dissecting Red Tailed Hawk 2 by Bagheera3 (https://www.deviantart.com/bagheera3)
:thumb125509468: :thumb125509249: :thumb125509468:
First off, please introduce yourself?
My name is Bill Douglas and I live in Ontario, Canada. I am 68 years old and I started carving as a hobby, 12 years ago.
Please explain what we are viewing.
This is a red-tailed hawk which I carved from tupelo wood. It is approximately 1/4 life-size. I made it in 2006. It is painted with acrylic paint.
Can you describe for a layman how it’s made?
I start
© 2008 - 2024 Myana
Comments4
Join the community to add your comment. Already a deviant? Log In
This is awesome! Very informative. I can't wait for more of these.
Thanks so much to both of you for taking the time.
Thanks so much to both of you for taking the time.