ShopDreamUp AI ArtDreamUp
Deviation Actions

The blueprint of... is an article serie where we’re taking a closer look on an Artisan Crafts deviation and how it's made.
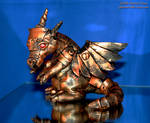
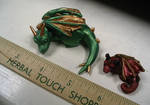
Today we are dissecting Copper Mech Dragon by NycterisA
Hi! My name is Rachel Ross, and I'm thirty*coughsomething* years old. I am single, live in Ohio, and work by day as a technical editor.
This is sort of a "Steampunk" dragon, made of polymerclay, but painted to look like it is made of copper. I had fun figuring out how to make this look like it was metal.
Well if I am making a sculpture of any size, I usually start with an armature of wire and tinfoil packed into a rough shape. For this one, I knew I would need some claws/horns so I made and baked them ahead of time. Then I work in layers, baking as I go, until I end up with the finished product. After it was done, I painted the entire thing black, then the copper color - this gave it an aged look. Green under the copper would probably have worked too.
My workshop, theoretically, is the attic - but I generally haul all the craft supplies down to another room when I'm working. Who really wants to be alone in the attic? (It's a really neat attic, but...) Anyway I'd say my favorite tools are dental tools, embroidery needles, and the clay tools that you buy at chain craft stores. But no tool really compares to your own fingertips. For this piece it was especially important for me to use a pasta machine, to make those "metal-like" smooth sheets of clay. I also used actual nails to make the rivet marks.
I was thinking about all the "Windstone" etc. edition dragons you see in catalogs, and decided I should make a piece a little larger than my usual tiny pieces, to be more like those. Since I like Steam (not to mention, it's quite "in") I decided to work that theme into the piece.
I don't remember; I worked out the initial part and then let it sit for a long time, not knowing where I was going with it. Then when I continued, I worked on it over a series of evenings/weekends, since I work during the day.
YES! I was not thinking when I began, and made the wing-armature a part of the body armature, so I could not detach and work on the wings separately! This made covering them with clay a real pain.
I am very happy with the result! The only thing I'm not sure about is the red eyes. Perhaps another color would have looked friendlier.
Oh I'm just self-taught. When I was little I loved to play with "plasticine" all the time. The first time I picked up polymer clay I hated it - it was hard and crumbled. Then later when I tried the softer brands, learned to love sculpting all over again. But I really want to improve! I have so many areas I need to work on.
I am lazy, and usually snap mediocre photos; the biggest tip I have is use a very bright light source. I finally bought a light box, and, when I have the patience to use it, it looks great - I did use it on this photo. Also my new cheap camera works great. The difference between it and cameras I had in the past is: Image Stabilization. I took this photo with a big Canon SLR, but my cheap point-n-shoot works almost as well. If you have to pick one camera for this sort of work, go with an inexpensive one with IS - though the big SLR is great for "serious photography", sometimes you can get the results you want with a cheap camera too.
The first thing I did was buy a massive amount (ok not that massive, probably 8 lbs) of "Sculpey" - the cheap white classroom kind. Then I gave myself liberty to play with it all I wanted, because I didn't have to worry about running out. This let me try new techniques. I don't know why, but I am paranoid about running out of craft supplies, and have a big tendency to stockpile them.
I do not use "Sculpey" very much now; I use mostly either Sculpey III or Premo, Sculpey Firm, or mix them together.
The other tip I have is "buy cheap clay and then paint it the color you want" works just as well as buying the actual tiny blocks of color you want.
Yep, I sold this piece to a friend, but if you are interested in something like it I would definitely love to talk to you. I also selll art at Artfire (glimmerville.artfire.com ) and Etsy (glimmerville.etsy.com ) which you can also get to from my website, Glimmerville.com I sometimes do shows in the area. I don't sell very much in person or online (though I'd like to sell it to you if you are interested) - mostly I make art because it is fun.

Thank you NycterisA for participating and taking the time to answer my question!
//Myana
I'd love to recive suggestions for next "victim" to interview! Note me with a link to the deviation you'd like to know more about and I'll contact the deviant.
Previous articles:
• The blueprint of... My Little Alien
• The blueprint of... Devil Claw Gargoyle
• The blueprint of... 30 full view
• The blueprint of... Flying Jewel Ring
• The blueprint of... Golden Chinese Dragon
• The blueprint of... Leather corset
• The blueprint of... Galding's Runesmith Armor
• The blueprint of... corset with gussets
• The blueprint of... Red Cross 9.26.08
• The blueprint of... Rosemary 1
• The blueprint of... Tsuru
• The blueprint of... Duct Tape Queen Of Hearts
• The blueprint of... Snekkja
• The blueprint of... Dragon Chain Revisited
• The blueprint of... More Vessels
• The blueprint of... Cosplay: Belle
• The blueprint of... Calla Lilly Chocolate Box
• The blueprint of... Louis Vuitton Hand bag cake
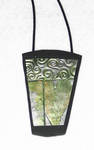
• The blueprint of... Red wave glass tile pendant
• The blueprint of... Pharoah's Horses
Today we are dissecting Copper Mech Dragon by NycterisA
First off, please introduce yourself?
Hi! My name is Rachel Ross, and I'm thirty*coughsomething* years old. I am single, live in Ohio, and work by day as a technical editor.
Please explain what we are viewing.
This is sort of a "Steampunk" dragon, made of polymerclay, but painted to look like it is made of copper. I had fun figuring out how to make this look like it was metal.
Can you describe for a layman how it’s made?
Well if I am making a sculpture of any size, I usually start with an armature of wire and tinfoil packed into a rough shape. For this one, I knew I would need some claws/horns so I made and baked them ahead of time. Then I work in layers, baking as I go, until I end up with the finished product. After it was done, I painted the entire thing black, then the copper color - this gave it an aged look. Green under the copper would probably have worked too.
What tools did you use?
My workshop, theoretically, is the attic - but I generally haul all the craft supplies down to another room when I'm working. Who really wants to be alone in the attic? (It's a really neat attic, but...) Anyway I'd say my favorite tools are dental tools, embroidery needles, and the clay tools that you buy at chain craft stores. But no tool really compares to your own fingertips. For this piece it was especially important for me to use a pasta machine, to make those "metal-like" smooth sheets of clay. I also used actual nails to make the rivet marks.
What was your inspiration in creating this?
I was thinking about all the "Windstone" etc. edition dragons you see in catalogs, and decided I should make a piece a little larger than my usual tiny pieces, to be more like those. Since I like Steam (not to mention, it's quite "in") I decided to work that theme into the piece.
How long time did it take you to make this?
I don't remember; I worked out the initial part and then let it sit for a long time, not knowing where I was going with it. Then when I continued, I worked on it over a series of evenings/weekends, since I work during the day.
Did you run into anything unexpected while creating?
YES! I was not thinking when I began, and made the wing-armature a part of the body armature, so I could not detach and work on the wings separately! This made covering them with clay a real pain.
Are you happy with the result?
I am very happy with the result! The only thing I'm not sure about is the red eyes. Perhaps another color would have looked friendlier.
Where have you learnt your skills in this area?
Oh I'm just self-taught. When I was little I loved to play with "plasticine" all the time. The first time I picked up polymer clay I hated it - it was hard and crumbled. Then later when I tried the softer brands, learned to love sculpting all over again. But I really want to improve! I have so many areas I need to work on.
Do you take your own photos? Any tips you want to share for presenting your work?
I am lazy, and usually snap mediocre photos; the biggest tip I have is use a very bright light source. I finally bought a light box, and, when I have the patience to use it, it looks great - I did use it on this photo. Also my new cheap camera works great. The difference between it and cameras I had in the past is: Image Stabilization. I took this photo with a big Canon SLR, but my cheap point-n-shoot works almost as well. If you have to pick one camera for this sort of work, go with an inexpensive one with IS - though the big SLR is great for "serious photography", sometimes you can get the results you want with a cheap camera too.
What is the best tip you can give to others wanting to test this craft/material/technique?
The first thing I did was buy a massive amount (ok not that massive, probably 8 lbs) of "Sculpey" - the cheap white classroom kind. Then I gave myself liberty to play with it all I wanted, because I didn't have to worry about running out. This let me try new techniques. I don't know why, but I am paranoid about running out of craft supplies, and have a big tendency to stockpile them.
I do not use "Sculpey" very much now; I use mostly either Sculpey III or Premo, Sculpey Firm, or mix them together.
The other tip I have is "buy cheap clay and then paint it the color you want" works just as well as buying the actual tiny blocks of color you want.
Are you selling your work?
Yep, I sold this piece to a friend,
but if you are interested in something like it I would definitely love to talk to you. I also selll art at Artfire (glimmerville.artfire.com ) and Etsy (glimmerville.etsy.com ) which you can also get to from my website, Glimmerville.com I sometimes do shows in the area. I don't sell very much in person or online (though I'd like to sell it to you if you are interested) - mostly I make art because it is fun.
Thank you NycterisA for participating and taking the time to answer my question!
//Myana
I'd love to recive suggestions for next "victim" to interview! Note me with a link to the deviation you'd like to know more about and I'll contact the deviant.
Previous articles:
• The blueprint of... My Little Alien
• The blueprint of... Devil Claw Gargoyle
• The blueprint of... 30 full view
• The blueprint of... Flying Jewel Ring
• The blueprint of... Golden Chinese Dragon
• The blueprint of... Leather corset
• The blueprint of... Galding's Runesmith Armor
• The blueprint of... corset with gussets
• The blueprint of... Red Cross 9.26.08
• The blueprint of... Rosemary 1
• The blueprint of... Tsuru
• The blueprint of... Duct Tape Queen Of Hearts
• The blueprint of... Snekkja
• The blueprint of... Dragon Chain Revisited
• The blueprint of... More Vessels
• The blueprint of... Cosplay: Belle
• The blueprint of... Calla Lilly Chocolate Box
• The blueprint of... Louis Vuitton Hand bag cake
• The blueprint of... Red wave glass tile pendant
• The blueprint of... Pharoah's Horses
Exciting news: New job!!
Theater carpenter
Last week I started a new job as a carpenter at the city's theater, I'll be doing backdrops/coulisses, props, furnitures and much more. I'm quite excitied to be working much more creative and to be back in a workshop. :yay: (The job I've had for the last year have been reparing stuff at people's houses.)
Hopefully they'll let me photograph what I do and if so, you'll see it :)
New camera
And to celebrate my new job, I went a bought myself a new camera. I couldn't spend too much on it, but I went with Canon EOS 550 D with a 18-135 objective. I'm really satisfied with it. Now I'm waiting for spring so I go out and shoot :)
Not dead
Wow, first submissions in over a year!!
Everyone, I'm aliiiiive! :P
Although I'm probably not gonna be any more active, I just wanted you to know I'm doing great. Svante is soon 2.5 years and offcourse he's a bundle of joy!
How are you all?
:thumb197524914: :thumb197526347:
ArtisanCraft Group
Groups
As you know by now, the new shiney Group-system is in BETA now and lots and lots of clubs are converted to it.
#ArtisanCraft (https://www.deviantart.com/artisancraft) ArtisanCraft (https://www.deviantart.com/artisancraft) has successfully converted to a group and I was delighted to be asked by MyntKat (https://www.deviantart.com/myntkat), who is handling the wheel on that ship now, if I wanted to be part of the club as co-admin again. Of ocurse! I will try to be a little more active, both on the club and on my personal account.
I've only played with the group a little, but man - I love it! The things I've seen is making the life of a group-admin soooo much easier. Way to go, tech team of dA! We salute you!! :heart:
Recent AC fav's
:t
The blueprint of... Red Tailed Hawk 2
The blueprint of... is an article series in which we’re taking a closer look at an Artisan Crafts deviation and how it's made.
Today we are dissecting Red Tailed Hawk 2 by Bagheera3 (https://www.deviantart.com/bagheera3)
:thumb125509468: :thumb125509249: :thumb125509468:
First off, please introduce yourself?
My name is Bill Douglas and I live in Ontario, Canada. I am 68 years old and I started carving as a hobby, 12 years ago.
Please explain what we are viewing.
This is a red-tailed hawk which I carved from tupelo wood. It is approximately 1/4 life-size. I made it in 2006. It is painted with acrylic paint.
Can you describe for a layman how it’s made?
I start
© 2009 - 2024 Myana
Comments6
Join the community to add your comment. Already a deviant? Log In
Just so gorgeousssss! 
