ShopDreamUp AI ArtDreamUp


Exciting news: New job!!
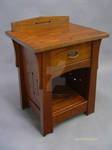
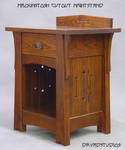
Theater carpenter
Last week I started a new job as a carpenter at the city's theater, I'll be doing backdrops/coulisses, props, furnitures and much more. I'm quite excitied to be working much more creative and to be back in a workshop. :yay: (The job I've had for the last year have been reparing stuff at people's houses.)
Hopefully they'll let me photograph what I do and if so, you'll see it :)
New camera
And to celebrate my new job, I went a bought myself a new camera. I couldn't spend too much on it, but I went with Canon EOS 550 D with a 18-135 objective. I'm really satisfied with it. Now I'm waiting for spring so I go out and shoot :)
Not dead
Wow, first submissions in over a year!!
Everyone, I'm aliiiiive! :P
Although I'm probably not gonna be any more active, I just wanted you to know I'm doing great. Svante is soon 2.5 years and offcourse he's a bundle of joy!
How are you all?
:thumb197524914: :thumb197526347:
ArtisanCraft Group
Groups
As you know by now, the new shiney Group-system is in BETA now and lots and lots of clubs are converted to it.
#ArtisanCraft (https://www.deviantart.com/artisancraft) ArtisanCraft (https://www.deviantart.com/artisancraft) has successfully converted to a group and I was delighted to be asked by MyntKat (https://www.deviantart.com/myntkat), who is handling the wheel on that ship now, if I wanted to be part of the club as co-admin again. Of ocurse! I will try to be a little more active, both on the club and on my personal account.
I've only played with the group a little, but man - I love it! The things I've seen is making the life of a group-admin soooo much easier. Way to go, tech team of dA! We salute you!! :heart:
Recent AC fav's
:t
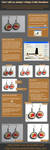
The blueprint of... Red Tailed Hawk 2
The blueprint of... is an article series in which we’re taking a closer look at an Artisan Crafts deviation and how it's made.
Today we are dissecting Red Tailed Hawk 2 by Bagheera3 (https://www.deviantart.com/bagheera3)
:thumb125509468: :thumb125509249: :thumb125509468:
First off, please introduce yourself?
My name is Bill Douglas and I live in Ontario, Canada. I am 68 years old and I started carving as a hobby, 12 years ago.
Please explain what we are viewing.
This is a red-tailed hawk which I carved from tupelo wood. It is approximately 1/4 life-size. I made it in 2006. It is painted with acrylic paint.
Can you describe for a layman how it’s made?
I start
© 2008 - 2024 Myana
Comments106
Join the community to add your comment. Already a deviant? Log In
This just continues to be helpful Myana! I send a link to this to others when I can.  (Smile)") I love it!
I love it!