
Journals432
Newest


Join the community to add your comment. Already a deviant? Log In


Join the community to add your comment. Already a deviant? Log In


Join the community to add your comment. Already a deviant? Log In
The blueprint of... Red Tailed Hawk 2
13 min read
The blueprint of... is an article series in which we’re taking a closer look at an Artisan Crafts deviation and how it's made.
Today we are dissecting Red Tailed Hawk 2 by Bagheera3
My name is Bill Douglas and I live in Ontario, Canada. I am 68 years old and I started carving as a hobby, 12 years ago.
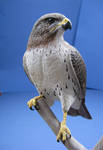
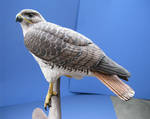
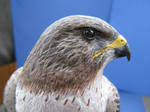
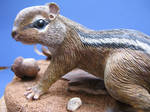
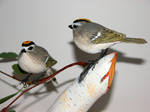
This is a red-tailed hawk which I carved from tupelo wood. It is approximately 1/4 life-size. I made it in 2006. It is painted with acrylic paint.
I start with a pattern of what I want to carve and draw it on top and side of the piece of wood I am going to use (usually tupelo). I then use a band saw to rough cut it. I then use rotary tools and the patter to shape it. Using a variety of bits, I carve, shape, and texture, the bird or animal. Using a wood burner, I do further texturing of the feathers (or fur). The primaries and secondaries and coverlets only are burned. The rest of the body feathers are stoned (a special bit) and burned. I form the legs from wire and putty and build the habitat from wood and sheet brass (leaves).
I created my own little studio (wife's name for my workroom) in our basement where I do my work.
I like carving birds of prey and this bird is common in our area.
It took about 60 hours from start to finish spread over 10 weeks.
I did not encounter any real problem with this particular bird. It is very important to have good reference pictures which I usually find on the internet.
I am pleased with the results.
We have a friend who took up carving and then decided to teach classes in the techniques. We have formed a club and by going weekly and branching out into mammals or new birds, we are always learning new skills and techniques and better ways of doing things. Having proper tools and paint brushes are important. Approximately a dozen people take part.
This summer we visited the Wye Marsh where they have an area with birds of prey. I was able to get some good close up pictures of several owls and hawks. Mostly I have to rely on pictures from books or the internet.
The pictures I put on deviant art, I take on my digital camera.
Anyone who has a sincere interest in this hobby, should give it a try. One important piece of equipment needed is a visor with a magnifying lens.
At the moment, I have not offered any of my pieces for sale.
I have, however, donated several pieces to our annual church auction and have given several as gifts to relatives.
As I run out of space, I am considering maybe offering some for sale.


Thank you Bagheera3 for participating and taking the time to answer my questions!
//Myana
I'd love to receive suggestions for the next "victim" to interview! Note me with a link to the deviation you'd like to know more about and I'll contact the deviant.
Previous articles:
• The blueprint of... My Little Alien by Spippo
• The blueprint of... Devil Claw Gargoyle by ART-fromthe-HEART
• The blueprint of... 30 full view by vankuilenburg
• The blueprint of... Flying Jewel Ring by LaughingScarab
• The blueprint of... Golden Chinese Dragon by Richi89
• The blueprint of... Leather corset by tupali
• The blueprint of... Galding's Runesmith Armor by farmerownia
• The blueprint of... corset with gussets by crissycatt
• The blueprint of... Red Cross 9.26.08 by UniquelyYours
• The blueprint of... Rosemary 1 by dollmaker88
• The blueprint of... Tsuru by merimask
• The blueprint of... Duct Tape Queen Of Hearts by DuckTapeBandit
• The blueprint of... Snekkja by Thorleifr
• The blueprint of... Dragon Chain Revisited by StephaniePride
• The blueprint of... More Vessels by ellyloo
• The blueprint of... Cosplay: Belle by Adella
• The blueprint of... Calla Lilly Chocolate Box by Sliceofcake
• The blueprint of... Louis Vuitton Hand bag cake by Dragonsanddaffodils
• The blueprint of... Red wave glass tile pendant by inchworm
• The blueprint of... Pharoah's Horses by indeestudios
• The blueprint of... Copper Mech Dragon by NycterisA
• The blueprint of... Armor by flintlockprivateer
• The blueprint of... Shrimp by YAGGOB
• The blueprint of... Tears of a Clown B by cdlitestudio
• The blueprint of... Gothic Armour - Full View. by Ageofarmour
• The blueprint of... Lulu - FFX 10 by yayacosplay
• The blueprint of... Wibble pot 003 by alex190381
• The blueprint of... Minas Tirith 58 Special part 1 by Minas-Tirith-Hakan
• The blueprint of... Criptex by the-metalchemist
Today we are dissecting Red Tailed Hawk 2 by Bagheera3
First off, please introduce yourself?
My name is Bill Douglas and I live in Ontario, Canada. I am 68 years old and I started carving as a hobby, 12 years ago.
Please explain what we are viewing.
This is a red-tailed hawk which I carved from tupelo wood. It is approximately 1/4 life-size. I made it in 2006. It is painted with acrylic paint.
Can you describe for a layman how it’s made?
I start with a pattern of what I want to carve and draw it on top and side of the piece of wood I am going to use (usually tupelo). I then use a band saw to rough cut it. I then use rotary tools and the patter to shape it. Using a variety of bits, I carve, shape, and texture, the bird or animal. Using a wood burner, I do further texturing of the feathers (or fur). The primaries and secondaries and coverlets only are burned. The rest of the body feathers are stoned (a special bit) and burned. I form the legs from wire and putty and build the habitat from wood and sheet brass (leaves).
What tools did you use?
I created my own little studio (wife's name for my workroom) in our basement where I do my work.
What was your inspiration in creating this?
I like carving birds of prey and this bird is common in our area.
How much time did it take you to make this?
It took about 60 hours from start to finish spread over 10 weeks.
Did you run into anything unexpected while creating this?
I did not encounter any real problem with this particular bird. It is very important to have good reference pictures which I usually find on the internet.
Are you happy with the result?
I am pleased with the results.
Where have you learnt your skills in this area?
We have a friend who took up carving and then decided to teach classes in the techniques. We have formed a club and by going weekly and branching out into mammals or new birds, we are always learning new skills and techniques and better ways of doing things. Having proper tools and paint brushes are important. Approximately a dozen people take part.
This summer we visited the Wye Marsh where they have an area with birds of prey. I was able to get some good close up pictures of several owls and hawks. Mostly I have to rely on pictures from books or the internet.
Do you take your own photos? Any tips you want to share for presenting your work?
The pictures I put on deviant art, I take on my digital camera.
What is the best tip you can give to others wanting to test this craft/material/technique?
Anyone who has a sincere interest in this hobby, should give it a try. One important piece of equipment needed is a visor with a magnifying lens.
Are you selling your work?
At the moment, I have not offered any of my pieces for sale.
I have, however, donated several pieces to our annual church auction and have given several as gifts to relatives.
As I run out of space, I am considering maybe offering some for sale.
Thank you Bagheera3 for participating and taking the time to answer my questions!
//Myana
I'd love to receive suggestions for the next "victim" to interview! Note me with a link to the deviation you'd like to know more about and I'll contact the deviant.
Previous articles:
• The blueprint of... My Little Alien by Spippo
• The blueprint of... Devil Claw Gargoyle by ART-fromthe-HEART
• The blueprint of... 30 full view by vankuilenburg
• The blueprint of... Flying Jewel Ring by LaughingScarab
• The blueprint of... Golden Chinese Dragon by Richi89
• The blueprint of... Leather corset by tupali
• The blueprint of... Galding's Runesmith Armor by farmerownia
• The blueprint of... corset with gussets by crissycatt
• The blueprint of... Red Cross 9.26.08 by UniquelyYours
• The blueprint of... Rosemary 1 by dollmaker88
• The blueprint of... Tsuru by merimask
• The blueprint of... Duct Tape Queen Of Hearts by DuckTapeBandit
• The blueprint of... Snekkja by Thorleifr
• The blueprint of... Dragon Chain Revisited by StephaniePride
• The blueprint of... More Vessels by ellyloo
• The blueprint of... Cosplay: Belle by Adella
• The blueprint of... Calla Lilly Chocolate Box by Sliceofcake
• The blueprint of... Louis Vuitton Hand bag cake by Dragonsanddaffodils
• The blueprint of... Red wave glass tile pendant by inchworm
• The blueprint of... Pharoah's Horses by indeestudios
• The blueprint of... Copper Mech Dragon by NycterisA
• The blueprint of... Armor by flintlockprivateer
• The blueprint of... Shrimp by YAGGOB
• The blueprint of... Tears of a Clown B by cdlitestudio
• The blueprint of... Gothic Armour - Full View. by Ageofarmour
• The blueprint of... Lulu - FFX 10 by yayacosplay
• The blueprint of... Wibble pot 003 by alex190381
• The blueprint of... Minas Tirith 58 Special part 1 by Minas-Tirith-Hakan
• The blueprint of... Criptex by the-metalchemist
Join the community to add your comment. Already a deviant? Log In
The blueprint of... Criptex
18 min read
The blueprint of... is an article series in which we’re taking a closer look at an Artisan Crafts deviation and how it's made.
Today we are dissecting Criptex by the-metalchemist

My name is Jake Wakefield. I'm a graphic designer and illustrator from Fort Collins, Colorado.
You can find me at the-metalchemist
“The Cryptex” is a metalsmithing piece, specifically coppersmithing. It is a cylinder that is about eight inches tall and has a diameter of about two inches. There are really only two parts to the cryptex. On the outside is the copper shell, I can't remember the gauge thickness right off the top of my head. The shell is only covered with a basic patina.
The interior is the interesting bit. The interior is a slightly smaller cylinder, a little smaller in length and diameter than the exterior so it can rotate freely in the shell. The interior is cut with a maze pattern. The piece is primarily copper with a bit of silver solder here and there.
It is meant to be a puzzle. It can only be opened by navigating a pin hidden inside through the maze. It can only be opened by completing the maze.
First there was the design. The original cryptex design could be easily described as absolutely over the top. Instead of just the maze that made it to the final version, there were five or six layers. One layer had eight basic keys that would open eight basic locks. I worked out a very, very simple lock that could have worked. I can't even remember the other layers without digging up the old sketches.
We had to have all of our designs checked by out professor. Her response was something like “Are you freaking crazy? theres no way you will get this done in time.” She was absolutely right. I might have had the time if I had dropped all my other classes and started eating and sleeping in the metalsmithing shop. I simplified the design to feature only the maze.
The shell's construction is as simple as it looks. I went over to a local hardware/plumbing store and bought myself a nice length of copper tubing. It cut a lot of time off trying to form it myself and meant more time for me to spend on the interior.
The interior maze was a completely different story. I created the maze that would be cut into the interior cylinder on my computer. I ended up with two interiors built in the end. The first one I attempted to use a dremel tool to carve out the path. I figured it would be quick and easy. It also looked horrible and messy. The second was cut out with a saw. It took forever but ended with a lot cleaner lines in the maze.
After the interior and exteriors were made there was a little bit of soldering to attach the guide pin and the pin back.
All of us students had to use the college's metalsmithing workshop. I think I was in the dorms at the time, so there wasn't really any where else to work other than there. The list of tools for this project was small. A jeweler's saw, a rubber forming mallet, and a soldering torch. That was it. Well that and saw blades. Anyone who has used a jeweler's saw knows that the blades break all the time. It's a pretty regular thing. That's why places sell big packs with 20 or so blades in them. I lost count on how many packs of blades I went through.
The first bit of inspiration came from my professor. We were given a theme for each project. The theme for this project was “hidden meaning.” So I decided to do something that kept a message or some hidden thing inside of it. Not only would the item contained be hidden, but I wanted the path to find it to be hidden as well. “The DaVinci Code” was big at the time and I liked the idea of the “Cryptex” the little cylinder that holds a hidden clue. That's where I started.
The name “Cryptex” comes from “The DaVinci Code.” The word is a combination of “cryptography” and “codex.” It more or less means “Code Scroll.” I think it mentions that in the book or maybe I just saw that definition on-line somewhere. Dan Brown combined two word as well as two ideas when he imagined the cryptex. I did something similar and formed my own combo.
The first part was created from an old roman cypher method. A message would be written on a medium that was wrapped around a dowel. When the message was unwrapped, the message was scrambled as one long jumble of letters. Pretty basic. The second part was the labyrinth / maze, which doesn't need much of an explanation.
I took the maze, wrapped it around a cylinder. It didn't seem too cool to me at the time, that's why I added so many more layers to it. I guess it should really be called something more like “Labypher” or “Cyphrinth”.
I think we were given around two weeks on each project. I just remember being in the metalsmithing studio late more than a few times when the deadline was getting close.
After cutting the entire piece I had to form it and solder it into a cylinder. I made the walls that were meant to be soldered too wide. They would heat up slower than the small walls of the maze. I ended up melting one of the walls of the maze a bit. Luckily, it was in an easy to fix area.
I also found out that copper might not have been the best choice for the project. The parts where the maze connected to the support areas are weak, and adding extra supports would have meant blocking major parts of the maze. I ended up getting a B on the project because of that.
I am happy with it. If I could go back and change anything, I would go back and make it out of something a bit stronger like brass or bronze. If I ever get the chance, I think it would be good time to try and make the full version I originally sketched out.
I graduated from Colorado State University. I got my BFA with a Concentration in Graphic Design there. I took a few metalsmithing classes there to fill in some credits with something that looked interesting and fun. (Which is was, I recommend it wholeheartedly.) If it weren't for my counselor labeling it as a, “Huge and unnecessary waste of time,” I would have gotten a second concentration in metalsmithing. I liked it that much. But anyways, I learned just about everything I know about metalwork from the Metalsmithing Department there and Mrs. Haley Bates, my professor.
I didn't take any of the photos for my metal work. They were all taken by my professor, who had a lot more experience photographing metal than any of us students. She took photos for all of us to use and for her to use as slides for future classes.
As far as tips for presenting, I could ramble on even more about design and photography and so on. But just make sure the piece is clean, on a nice backdrop, everything is spelled right and there isn't anything embarrassing in the reflection on the metal.
As far as in-person presentation. All the advice I can give you is to never let delicate metalwork that requires a bit of problem solving skills into the hands of a drunken party guest. It won't end well.
Well, first off, know the difference between working with metals like copper, silver or even gold and working with iron or steel. The later of the two is in the realm of blacksmithing and requires a lot of very expensive torches, tools and tanks of gas. It's a totally different craft. If you are looking to get your feet wet with metalsmithing, head over to your craft store. The jewelry section is a good place for beginners.
If you are looking for something more in depth, some cities, colleges, community colleges or even hobby shops host seminars that can give you some good hands on experience.
Finally, know the limits. If you want to make some nice simple jewelry or metal projects, check out a few books, cruise the internet or experiment on your own. If you are looking to make something that requires heating or melting metals, I would definitely recommend a class. If you are looking to make something like a sword, find someone who knows what they are doing and apprentice under them, if possible.
Not at the moment. I've gotten a lot of requests about making copies of the Cryptex, but it isn't an option until I get enough supplies to have a usable workshop. The same goes for metalsmithing commissions, unfortunately. However, I'm always available as a graphic designer and illustrator. So if you're looking for some advice on a metalsmithing design or want help sketching something out, I might be able to oblige. Just shoot me a note on DeviantArt or email me at Jake.Wakefield@gmail.com


Thank you the-metalchemist for participating and taking the time to answer my questions!
//Myana
I'd love to receive suggestions for the next "victim" to interview! Note me with a link to the deviation you'd like to know more about and I'll contact the deviant.
Previous articles:
• The blueprint of... My Little Alien by Spippo
• The blueprint of... Devil Claw Gargoyle by ART-fromthe-HEART
• The blueprint of... 30 full view by vankuilenburg
• The blueprint of... Flying Jewel Ring by LaughingScarab
• The blueprint of... Golden Chinese Dragon by Richi89
• The blueprint of... Leather corset by tupali
• The blueprint of... Galding's Runesmith Armor by farmerownia
• The blueprint of... corset with gussets by crissycatt
• The blueprint of... Red Cross 9.26.08 by UniquelyYours
• The blueprint of... Rosemary 1 by dollmaker88
• The blueprint of... Tsuru by merimask
• The blueprint of... Duct Tape Queen Of Hearts by DuckTapeBandit
• The blueprint of... Snekkja by Thorleifr
• The blueprint of... Dragon Chain Revisited by StephaniePride
• The blueprint of... More Vessels by ellyloo
• The blueprint of... Cosplay: Belle by Adella
• The blueprint of... Calla Lilly Chocolate Box by Sliceofcake
• The blueprint of... Louis Vuitton Hand bag cake by Dragonsanddaffodils
• The blueprint of... Red wave glass tile pendant by inchworm
• The blueprint of... Pharoah's Horses by indeestudios
• The blueprint of... Copper Mech Dragon by NycterisA
• The blueprint of... Armor by flintlockprivateer
• The blueprint of... Shrimp by YAGGOB
• The blueprint of... Tears of a Clown B by cdlitestudio
• The blueprint of... Gothic Armour - Full View. by Ageofarmour
• The blueprint of... Lulu - FFX 10 by yayacosplay
• The blueprint of... Wibble pot 003 by alex190381
• The blueprint of... Minas Tirith 58 Special part 1 by Minas-Tirith-Hakan
Today we are dissecting Criptex by the-metalchemist
First off, please introduce yourself?
My name is Jake Wakefield. I'm a graphic designer and illustrator from Fort Collins, Colorado.
You can find me at the-metalchemist
Please explain what we are viewing.
“The Cryptex” is a metalsmithing piece, specifically coppersmithing. It is a cylinder that is about eight inches tall and has a diameter of about two inches. There are really only two parts to the cryptex. On the outside is the copper shell, I can't remember the gauge thickness right off the top of my head. The shell is only covered with a basic patina.
The interior is the interesting bit. The interior is a slightly smaller cylinder, a little smaller in length and diameter than the exterior so it can rotate freely in the shell. The interior is cut with a maze pattern. The piece is primarily copper with a bit of silver solder here and there.
It is meant to be a puzzle. It can only be opened by navigating a pin hidden inside through the maze. It can only be opened by completing the maze.
Can you describe for a layman how it’s made?
First there was the design. The original cryptex design could be easily described as absolutely over the top. Instead of just the maze that made it to the final version, there were five or six layers. One layer had eight basic keys that would open eight basic locks. I worked out a very, very simple lock that could have worked. I can't even remember the other layers without digging up the old sketches.
We had to have all of our designs checked by out professor. Her response was something like “Are you freaking crazy? theres no way you will get this done in time.” She was absolutely right. I might have had the time if I had dropped all my other classes and started eating and sleeping in the metalsmithing shop. I simplified the design to feature only the maze.
The shell's construction is as simple as it looks. I went over to a local hardware/plumbing store and bought myself a nice length of copper tubing. It cut a lot of time off trying to form it myself and meant more time for me to spend on the interior.
The interior maze was a completely different story. I created the maze that would be cut into the interior cylinder on my computer. I ended up with two interiors built in the end. The first one I attempted to use a dremel tool to carve out the path. I figured it would be quick and easy. It also looked horrible and messy. The second was cut out with a saw. It took forever but ended with a lot cleaner lines in the maze.
After the interior and exteriors were made there was a little bit of soldering to attach the guide pin and the pin back.
What tools did you use?
All of us students had to use the college's metalsmithing workshop. I think I was in the dorms at the time, so there wasn't really any where else to work other than there. The list of tools for this project was small. A jeweler's saw, a rubber forming mallet, and a soldering torch. That was it. Well that and saw blades. Anyone who has used a jeweler's saw knows that the blades break all the time. It's a pretty regular thing. That's why places sell big packs with 20 or so blades in them. I lost count on how many packs of blades I went through.
What was your inspiration in creating this?
The first bit of inspiration came from my professor. We were given a theme for each project. The theme for this project was “hidden meaning.” So I decided to do something that kept a message or some hidden thing inside of it. Not only would the item contained be hidden, but I wanted the path to find it to be hidden as well. “The DaVinci Code” was big at the time and I liked the idea of the “Cryptex” the little cylinder that holds a hidden clue. That's where I started.
The name “Cryptex” comes from “The DaVinci Code.” The word is a combination of “cryptography” and “codex.” It more or less means “Code Scroll.” I think it mentions that in the book or maybe I just saw that definition on-line somewhere. Dan Brown combined two word as well as two ideas when he imagined the cryptex. I did something similar and formed my own combo.
The first part was created from an old roman cypher method. A message would be written on a medium that was wrapped around a dowel. When the message was unwrapped, the message was scrambled as one long jumble of letters. Pretty basic. The second part was the labyrinth / maze, which doesn't need much of an explanation.
I took the maze, wrapped it around a cylinder. It didn't seem too cool to me at the time, that's why I added so many more layers to it. I guess it should really be called something more like “Labypher” or “Cyphrinth”.
How much time did it take you to make this?
I think we were given around two weeks on each project. I just remember being in the metalsmithing studio late more than a few times when the deadline was getting close.
Did you run into anything unexpected while creating this?
After cutting the entire piece I had to form it and solder it into a cylinder. I made the walls that were meant to be soldered too wide. They would heat up slower than the small walls of the maze. I ended up melting one of the walls of the maze a bit. Luckily, it was in an easy to fix area.
I also found out that copper might not have been the best choice for the project. The parts where the maze connected to the support areas are weak, and adding extra supports would have meant blocking major parts of the maze. I ended up getting a B on the project because of that.
Are you happy with the result?
I am happy with it. If I could go back and change anything, I would go back and make it out of something a bit stronger like brass or bronze. If I ever get the chance, I think it would be good time to try and make the full version I originally sketched out.
Where have you learnt your skills in this area?
I graduated from Colorado State University. I got my BFA with a Concentration in Graphic Design there. I took a few metalsmithing classes there to fill in some credits with something that looked interesting and fun. (Which is was, I recommend it wholeheartedly.) If it weren't for my counselor labeling it as a, “Huge and unnecessary waste of time,” I would have gotten a second concentration in metalsmithing. I liked it that much. But anyways, I learned just about everything I know about metalwork from the Metalsmithing Department there and Mrs. Haley Bates, my professor.
Do you take your own photos? Any tips you want to share for presenting your work?
I didn't take any of the photos for my metal work. They were all taken by my professor, who had a lot more experience photographing metal than any of us students. She took photos for all of us to use and for her to use as slides for future classes.
As far as tips for presenting, I could ramble on even more about design and photography and so on. But just make sure the piece is clean, on a nice backdrop, everything is spelled right and there isn't anything embarrassing in the reflection on the metal.
As far as in-person presentation. All the advice I can give you is to never let delicate metalwork that requires a bit of problem solving skills into the hands of a drunken party guest. It won't end well.
What is the best tip you can give to others wanting to test this craft/material/technique?
Well, first off, know the difference between working with metals like copper, silver or even gold and working with iron or steel. The later of the two is in the realm of blacksmithing and requires a lot of very expensive torches, tools and tanks of gas. It's a totally different craft. If you are looking to get your feet wet with metalsmithing, head over to your craft store. The jewelry section is a good place for beginners.
If you are looking for something more in depth, some cities, colleges, community colleges or even hobby shops host seminars that can give you some good hands on experience.
Finally, know the limits. If you want to make some nice simple jewelry or metal projects, check out a few books, cruise the internet or experiment on your own. If you are looking to make something that requires heating or melting metals, I would definitely recommend a class. If you are looking to make something like a sword, find someone who knows what they are doing and apprentice under them, if possible.
Are you selling your work?
Not at the moment. I've gotten a lot of requests about making copies of the Cryptex, but it isn't an option until I get enough supplies to have a usable workshop. The same goes for metalsmithing commissions, unfortunately. However, I'm always available as a graphic designer and illustrator. So if you're looking for some advice on a metalsmithing design or want help sketching something out, I might be able to oblige. Just shoot me a note on DeviantArt or email me at Jake.Wakefield@gmail.com
Thank you the-metalchemist for participating and taking the time to answer my questions!
//Myana
I'd love to receive suggestions for the next "victim" to interview! Note me with a link to the deviation you'd like to know more about and I'll contact the deviant.
Previous articles:
• The blueprint of... My Little Alien by Spippo
• The blueprint of... Devil Claw Gargoyle by ART-fromthe-HEART
• The blueprint of... 30 full view by vankuilenburg
• The blueprint of... Flying Jewel Ring by LaughingScarab
• The blueprint of... Golden Chinese Dragon by Richi89
• The blueprint of... Leather corset by tupali
• The blueprint of... Galding's Runesmith Armor by farmerownia
• The blueprint of... corset with gussets by crissycatt
• The blueprint of... Red Cross 9.26.08 by UniquelyYours
• The blueprint of... Rosemary 1 by dollmaker88
• The blueprint of... Tsuru by merimask
• The blueprint of... Duct Tape Queen Of Hearts by DuckTapeBandit
• The blueprint of... Snekkja by Thorleifr
• The blueprint of... Dragon Chain Revisited by StephaniePride
• The blueprint of... More Vessels by ellyloo
• The blueprint of... Cosplay: Belle by Adella
• The blueprint of... Calla Lilly Chocolate Box by Sliceofcake
• The blueprint of... Louis Vuitton Hand bag cake by Dragonsanddaffodils
• The blueprint of... Red wave glass tile pendant by inchworm
• The blueprint of... Pharoah's Horses by indeestudios
• The blueprint of... Copper Mech Dragon by NycterisA
• The blueprint of... Armor by flintlockprivateer
• The blueprint of... Shrimp by YAGGOB
• The blueprint of... Tears of a Clown B by cdlitestudio
• The blueprint of... Gothic Armour - Full View. by Ageofarmour
• The blueprint of... Lulu - FFX 10 by yayacosplay
• The blueprint of... Wibble pot 003 by alex190381
• The blueprint of... Minas Tirith 58 Special part 1 by Minas-Tirith-Hakan
Join the community to add your comment. Already a deviant? Log In